My reference guide to get new VTT players comfortable with playing a TTRPG like Old School Essentials in FoundryVTT.
I run and play in a lot of TTRPG games run with virtual tabletop apps like FoundryVTT, Fantasy Grounds, Owlbear Rodeo and Playrole.com
Jump to the bottom for a link to the PDF
Log In

- Logging in
- User configuration
Main UI
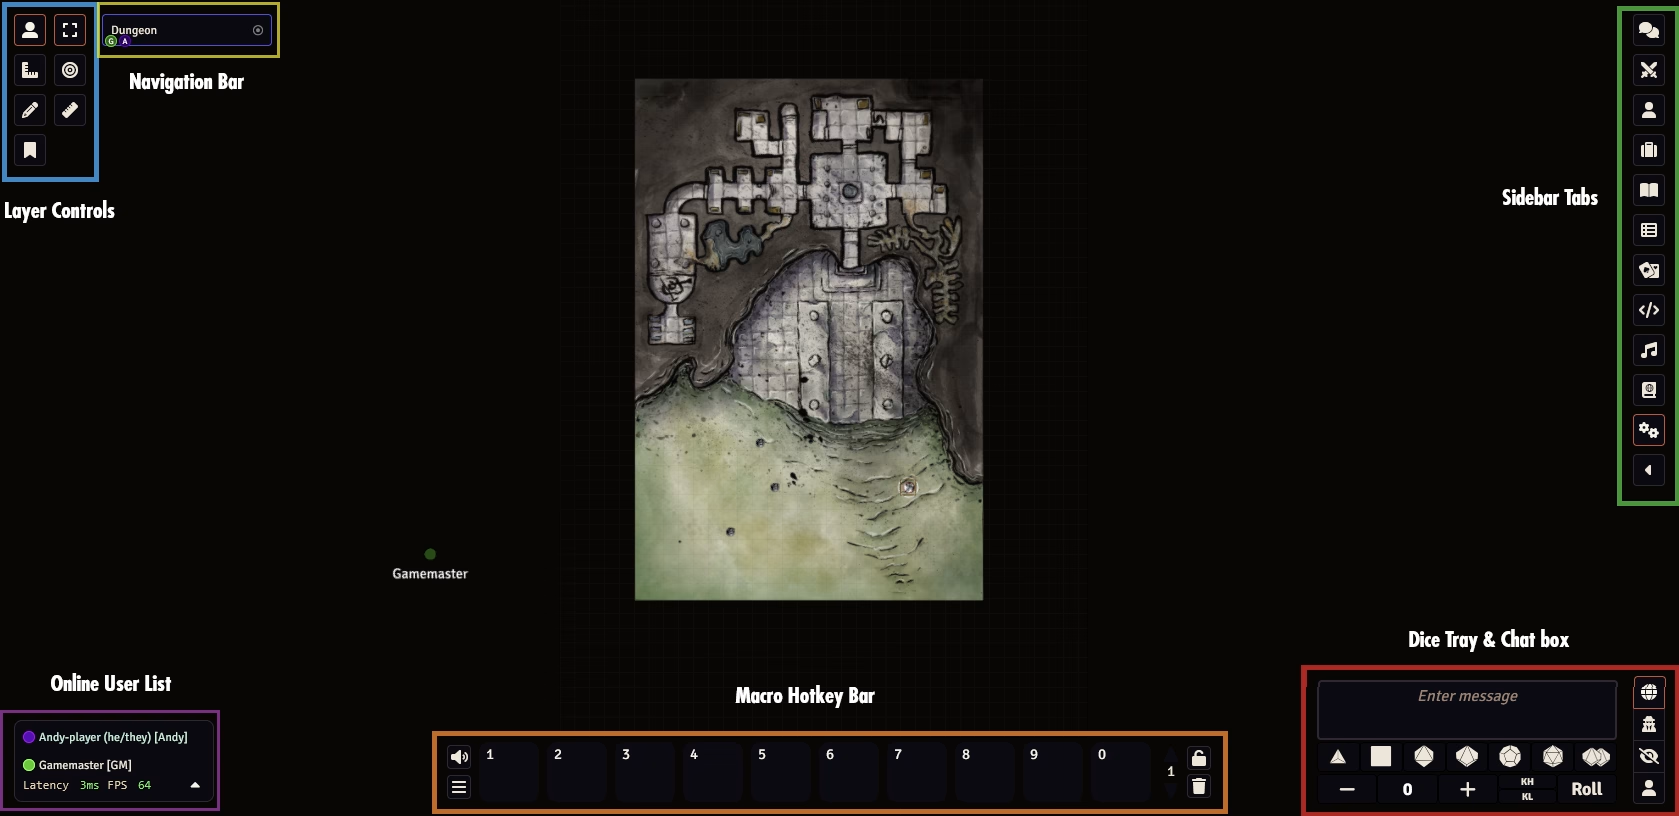
Left Side – Layer Controls
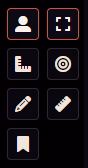
These select which “mode” your cursor is in when you interact with the map
Token Controls
The person icon
- Select Token: The main tool you will use to select and move your token around the map
- Target tool: This will allow you to select targets. Doing so will allow attack rolls etc to use their AC and apply damage. Targets can also be selected by pressing T while your cursor is over a token
- Measure Distance: This is handy for checking distances. Click+drag
Measurement Controls
The L-shaped ruler icon. This tools adds shape templates to the map. Mouse-over the icon and press Delete to remove.
- Circle Template: Draws circles on the map. Perfect for Darkness or Fireball spells
- Cone Template: Draws a cone shape template on the map. Perfect for Burning Hands spells
- Rectangle Template: Draws a rectangular template on the map
- Ray Template: Draws a 1-square wide linear template on the map
Drawing Tools
The pencil icon
- Selection Tool: For selecting, deleting and moving drawing elements
- Square Tool: Draws a square
- Circle Tool: Draws a circle
- Polygon Tool: Click points to draw a complex polygon
- Freehand Tool: Draw freehand on the map. This is what I use most often
- Text Tool: Add text to the map
- Toggle Information Drawings: I have no idea what this does
- Snap to Grid: Forces drawings to snap to the grid
- Configure Drawings: Change line color, fill color and other options.
Journal Notes
The bookmark/banner icon. Allows you to create or interact with mouse-over notes. More of a DM tools
- Select: Select notes, allows you to edit/move existing notes
- Create Notes: Creates a short text note that pops up when you mouse-over the icon in Token mode
- Toggle Display: Turns visibility of notes on/off when in token mode
Navigation Bar

The long rectangle button to the right of the top row of tools
This allows you to swap between maps. Usually, it will just show the name of the active map, but DM’s can set up maps you can always open, ie World Maps or Landing Pages
Tabs – Right Side
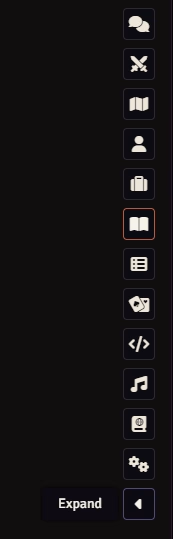
- Chat: This is the main chat log window.
This will be the one you use 99% of the time - Combat Tracker: This is the combat/initiative tracker.
In some games this is more important for players, but mostly a DM tools - Actors: This is where your player sheet will be, in addition to all other
PCs/NPCs/Monsters you have permission to view. Very Important for DMs - Items: Lists all the items entered into the game. Only lists items that
players have permissions to view. Another DM focused tab. - Journal: All the text documents in the game.
- Roll Tables: All the rollable tables in the game.
- Cards: All the card decks in the game per player permissions.
- Macros: All the macros available.
Macros are short bits of code you can trigger from a hotkey - Playlists: The audio controls for the game.
The global volume levels are set here if the DM is using ambience/music/effects - Compendiums: Collections of game assets. Usually where you find
all the official content packs etc. Some systems, like PF2e have players
accessing this but its usually a DM focused tables - Settings: All the system and ruleset customization options
- Dice Box: This is a module (3rd party plug-ins) that gives a simple dice
rolling interface. Click each die type to add it to the roll.
Multiple clicks add dice (ie 3d6). Click roll to roll.
Shows you the dice roll syntax for manual dice roll commands
Macro Hotkey Bar – Bottom
A row of hotkey slots triggered by pressing 1-0 on the keyboard. There are multiple pages to use.
Add items by drag-drop

Character Sheet

Top Bar

- Character Object Name: This is usually the name of your character
- Copy Document UUID: This copies the programs internal link address to that object
- OSE Specific Tweaks: This is where you can edit some features of the OSE rules, ie set XP bonus from Prime Req, activate Spellcasting, set as a Retainer etc. On Level Up, change the Next Level value to the next level XP value.
- Sheet: Developer option, best left alone
- Prototype Token: Changes the token options for new tokens created for this character. Useful if by default tokens don’t have Token Vision (they are blind on the map) or editing the token image and name
- Close: Closes the window
Basic Information
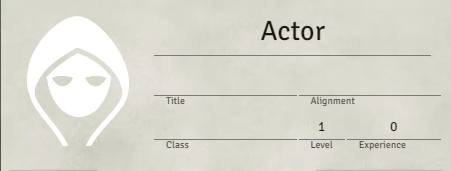
- Portrait Picture: Shows the profile image for the character. 2x click to open the file browser to select a new one. By default, it will also update the token image to the new one.
- Name: Name of your character. If you change this after creation, make sure to open Prototype Token and change Token Name to match.
- Title: You can type in your level title etc here.
- Alignment: You can type your alignment here.
- Class: Displays the class for the character. To select a class, drag-drop from the appropriate item in the Item tab of the Main UI
- Level: Displays the Current Level. It will flash green when you have met your Next Level xp value.
- Experience: Displays your current XP value
Attributes Page
The main page of your character sheet. Select it from the Attribute tab on the right edge of the Character Sheet
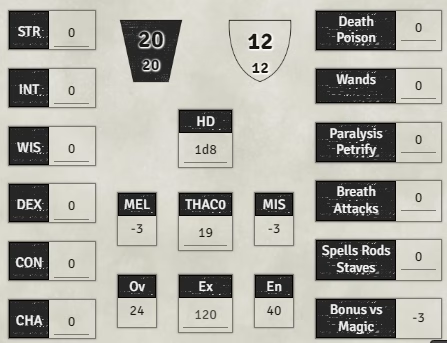
6 Attribute stats
- Text Box: Type your attribute stat values here. Very basic automation like To-Hit bonuses are automatically calculated when applicable
- Attribute Name: Clicking on this black box will roll that Attribute Check
HP – Type in values
- Current Hitpoints
- Maximum Hitpoints
AC – Autocalculates from DEX and Equipped Armor
- Current AC: includes armor
- Naked AC: without armor
HD – The value of your Hit Dice, set by your Class
MEL – Melee attack bonus. Autocalculated from your Attributes
THAC0 – Current THAC0 value. If DM set AAC mode in the system settings, this shows as To-Hit bonus
MIS – Missle Attack Bonus. Autocalculated from your Attributes
Ov: Overland travel distance in Miles (default 24)
Ex: Exploration travel distance in Feet (default 120)
En: Encounter/Combat travel distance in Feet (default 40)
Encumbrance’s effect on movement is automatically calculated from your inventory
Saving Throws – Work like the Attribute boxes
Abilities Page

All your characters special abilities and class skills
Listen Doors, Open Doors, Secret Door, Find Trap: Your main skills. Click the skill name to roll
Abilities: A list of your characters abilities, usually from your class. Click the + icon to add custom ones or drag-drop from the Item Tab
Inventory Page
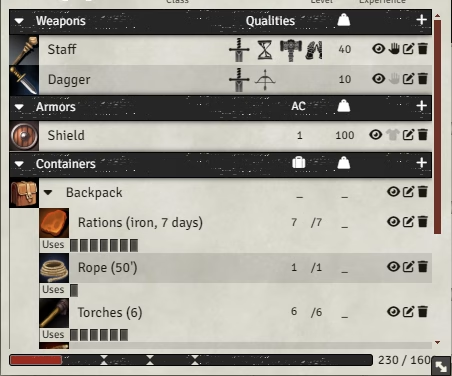
Lists your inventory by category & automatically tracks encumbrance (Encumbrance method set by the DM in system settings)
Drag-drop to add items from the Item Tab. Click the + icon to add custom items.
To Equip Items: On the right side of each item entry on the Inventory Page are options. Click on the little hand icon (weapons etc) or shirt icon (armor) to equip them. Equipped armor will add to your AC.
To Roll for Attack: Items with an associate roll, like a weapons To-Hit and Damage rolls, can be triggered by clicking on the item picture. When that picture is mouse-over, it will change to a d20 icon
Uses: Items that have a set number of uses, like torches or ammo, have a series of small checkboxes under the item name. Click to tick off
Encumbrance Meter: The bar at the bottom of the sheet is your current encumbrance. The carrot-ticks along the bar indicate the levels of encumbered effects (movement = 90ft, 60ft, 30ft)
Note Page
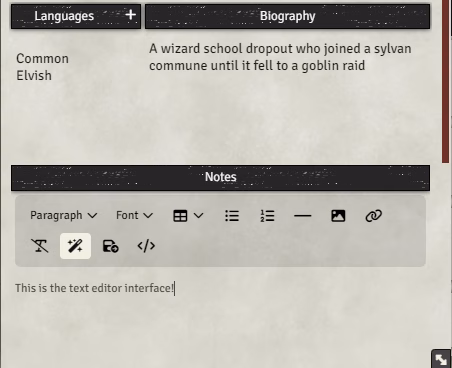
This is where you can record brief notes about your player, list known languages and add a brief bio. I wouldn’t try to use this for campaign notes, Journals are way better for that purpose.
Add Languages: To add a known language, click the + icon and select the language from the dropdown in the popup options window
Edit Bio and Notes: All large text boxes in Foundry require opening in Edit Mode. Mouse-over the text box and click the Edit Icon that pops up to open the Foundry text editor. REMEMBER TO HIT THE SAVE ICON!!
Combat!
Combat Tracker Tab
Open the Combat Tracker to see a list of combatants grouped by faction (friendly, neutral, hostile) and sorted by Initiative order. OSE defaults to Side based initiative, but can also use individual initiative.
There are many modules to give a nicer looking Combat Tracker interface, but they don’t like Side based initiative
If you use the Combat Tracker’s Next Turn button, it will cycle through the actors. The current actor in the tracker will get a audio ping in addition to a notification icon under their token.
Move
To move your token, click on it and drag to the new location OR use the WASD keys to move 1 step at a time. OSE by default will track your movement with a green line showing the total movement this turn. If youve used up your movement the line will turn red.
Target for an Attack or Spell
To target an actor for an attack or spell, mouse-over the target and press T. The target will get a red targeting reticle. Multiple targets can be selected at once. Targeted actors will automatically have their AC calculated in your To-Hit rolls, and will automatically deduct damage from their HP when you click the blood drop icon on the roll result Chat box.
Roll to Attack


To roll an Attack, click on the weapon item’s icon in your Inventory Page. When you mouse-over a weapon’s icon, it should change into a d20 symbol. This will open a dialog window with Melee and Missle options. The next window lets you enter any additional modifiers and whether the roll is Public (everyone can see), Blind GM (only the GM sees the result), Private GM (You and the GM can see the result) or Self (only you can see the result)
Spells
Just like Attacks, the spell’s icon on the Spell Page will turn into a d20 when mouse-over. Clicking will post the spell text to chat in addition any related rolls.
Treasure!
There are several ways to pick up treasure.
- Item Tab: Items can be dragged from the Item Tab if players have permission to view them
- Chat: Items can be dragged into chat for players to drag on to their character sheets. Linked items will appear in a grey box/button
- Dropped on map: Items can be dropped onto the map. Item Icons on the map can be clicked by players to add that item to their inventory. Only one player can click on these items.
- Manually Added: Players can also click the + icon in their inventory to add custom items.
XP for OSE is mainly handled by the DM. There is a handy tool that will automatically distribute XP to the party, accounting for XP bonus (if you set up your Tweaks correctly on your Character Sheet) and Retainers (they get a 50% cut). Players can also manually enter their XP on their character sheets if preferred.
Journals
These are the text documents in Foundry. They are super powerful, but a bit weird to interact with at first
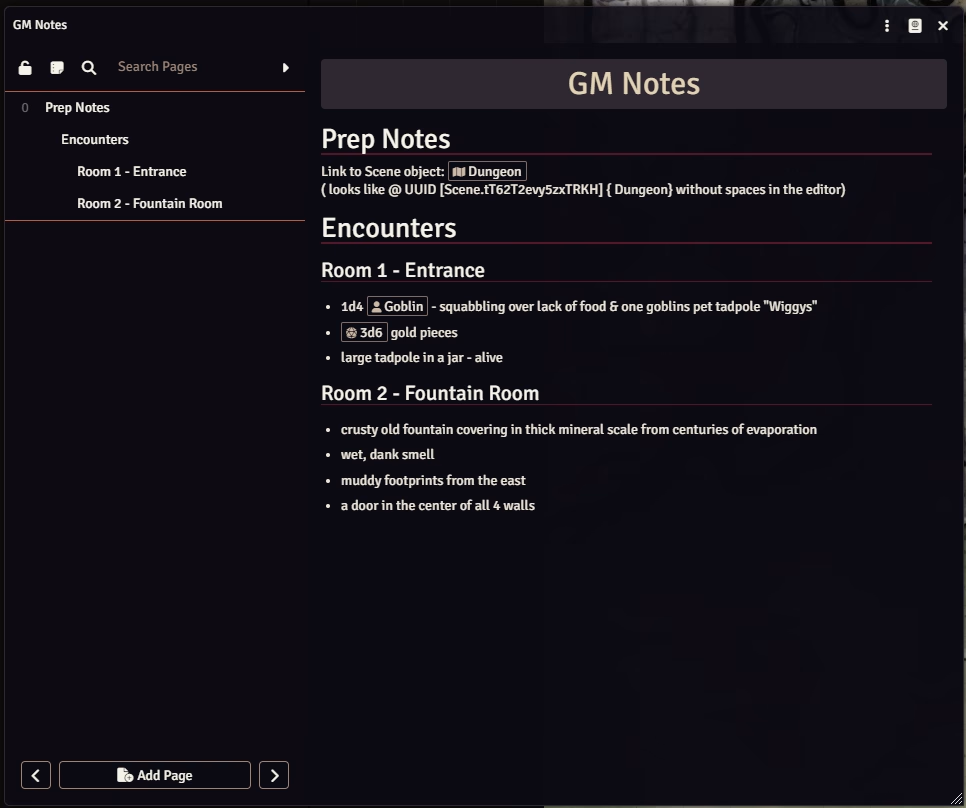
Journal UI
Top Bar: Toggle Controls (3 vertical dots icon) contains the option to Show Players. This shows the journal page to players with an option dialog box for specifying how its shown.
Navigation Sidebar: A list of the pages and headers inside the journal object. You can also add pages and search its contents.
Page Display: The contents of the selected journal page. Hovering over the page display will popup the editor icon.
Page Types
Text Page: The main page type. Works like a normal text editor with the ability to add images, links to game objects like items or npcs, website links and pdfs. I use this 99% of the time
Image Page A single image. Useful for handouts where you dont want all of your notes to be shared with Show Player
PDF Page: Load a PDF that will appear in an embedded pdf viewer.
Video Page: Load a video that will play inside Foundry
Editing Pages
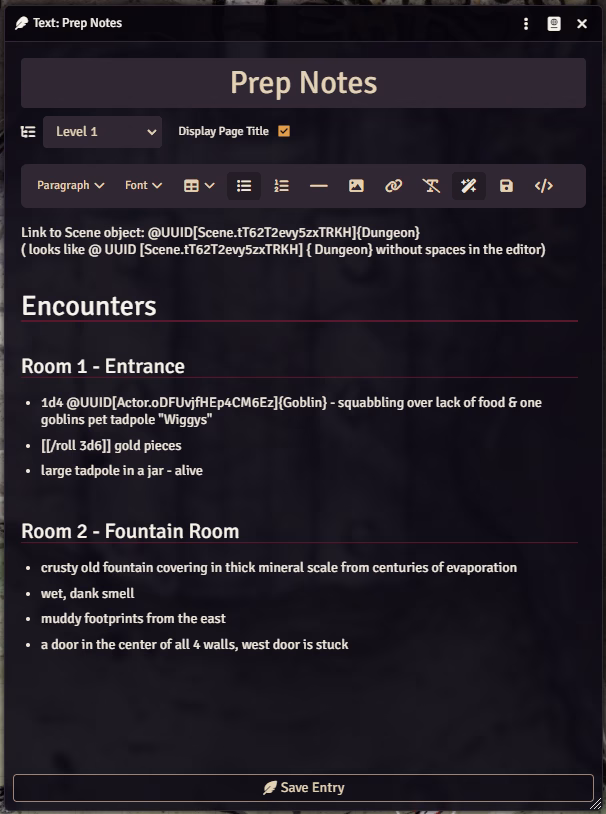
Create a Page and give it a name. There can be multiple pages in a journal. This will add the page and open the editor.
REMEMBER TO CLICK SAVE!! The editor has a 30 second autosave, but if you close the editor before you click save it will lose any data since the last autosave. If it doesn’t appear on the main journal page, its not saved.
The Editor interface works like most rich text editors. There are options for various headings and text formating. You can drag-drop images on to it, drag objects from the main UI sidebar tabs, create weblinks etc. You can also type in markdown format (think Discord or Reddits formatting syntax) and it will automatically add the formatting.
Adding headers to the text page will add links to the navigation sidebar of the journal to that section. An easy way to add headers is to type “# ” before the header name. This is markdown for Header 1. The more #’s the deeper the header. #### = Header 4 for example.
DID I MENTION TO REMEMBER TO SAVE!! its the floppy disk icon in the editor bar.

